THE INPUT PART
A Calculator is made up of 3 parts . The input (Keypad), output (digital display) and the processor.
The Calculator panel consist of a lot of components that work together to process numerical information. Though in normal Calculator you may not see all this. What you see is a central processor which have integrated all this components together.
In the class, we have seen and demonstrate how to create an adder, subtractor, multiplier, except for the divider. Also , we have discuss the multiplexer which help to select data source. Data to be fetched are stored in component called registers. To be able to fetch data, data are given addresses. so, multiplexer help to locate the data by selecting the address of the data.
One thing we have also learn is the conversion of binary to decimal by using BCD to seven segment converter and then display it with seven segment LED display. In Calculator, the keypad shows decimal numbers 0 to 9. Each decimal numbers have binary equivalent understood by the machine.
In the Calculator, there is a register that contain what is called key code for each key on the keypad. When a key is pressed, the code is transmitted and move to the display register to display the key pressed. Usually when a key is pressed it bounce back the moment it is released, but the register store the data transmitted.
On the Calculator is also found the operators for addition, subtraction, division and multiplication. When these are pressed the calculator has to perform switching operation among these operators, These are carried out by multiplexer. Multiplexers have what is called selection mode, which depend on the number of inputs required e.g 4 inputs required 22 – 2n Where n is number of selection. So, two bits will be required for 4 inputs.
You are going to create the calculator in parts. The display part, the keypad part and processing parts and connect or link them by a component called 'Tunnel' in Logisim.
Follow the diagram shown and try to pick from Logisim those components as shown. From the library open Memory and pick registers. Change them to 4 bits. Get Tunnel from the folder called wiring and label it to bear the caption with that of the keys. Check for the diagram of the key for the tunnels attached and label your own accordingly. The tunnel help to avoid wiring which may make the design clumsy. The component label MUX is the multiplexer. You can pick this from the folder labelled Plexers. Change the the Data bit and Sel bit to 4. Then it will look like the one shown. Position it as it is shown, that is facing south. Create this part and test to see what happen when you press any key. Lastly, under wiring you will see a component called constant. It is the gray coloured component bearing number 0 to 9 attached to the 'D' part of the register. when you pick it. change it to four bit and the value to 0x and the number (e.g 0x2 for value of 2).
KEY SELECTION PROCESSING
The next stage in fetching a number when a key is pressed is to select the number that will be display on the LED display. From the diagram, it show that all the registers for each key are connected to the multiplexer, but all of them cannot be output at the same time. We need to create a program that will do the selection. 4 bits are needed to select the ten numbers, so we need a circuit that will convert the decimal numbers to 4 bit binary numbers. We are going to create our converter by using Combinational Analysis as you have been taught.
The problem with this is that when add your input and output the input is always set aready for you then change the output to your taste. In this case, we are going to pick out of what have been set those binary numbers that start with 1 in each row to represent the different decimal numbers. So you select the row that have only 1 under the particular number and neglect the others. Then you change the output to bear the binary number for that decimal number.
The example is shown below.
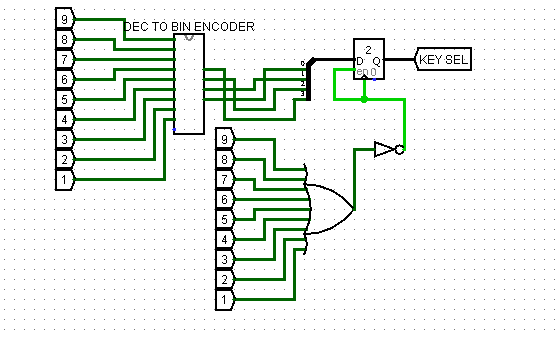
Create your inputs starting with N9 up to N0 so that it will appear as shown. Also add your outpu in the following order D, C, B, A. Then you will have the table shown above. The first row should be zero throughout. Second row has 1 under N0, Which mean when you click number zero you should get zero. 1 under N1 mean when you click number 1 you should have 0001 which stand for number 1. So do this for all the numbers up to number 9. Then click build circuit and call your circuit DEC TO BIN ENCODER. Under your main, select this circuit you have created and connect it as shown below.
This diagram indicate that the same copy of tunnel that was used for each key is also attached to the input of the ENCODER 1 to N1, 2 to N2 up to N9. Then choose a splitter from wiring and connect it with the ENCODER as shown. You can see that a register is also connected to pick the value when the key is pressed. pick an OR gate and connect the same tunnel of the keys and the output connected to the register as shown. Combine this with the first circuit and click each key and see what happen to the output at the end of MUX as shown earlier.
The second stage will be uploaded very soon. So, return to the site to check for the second stage.


Wanna Play Minecraft?
ReplyDelete