Search This Blog

Thursday, December 12, 2019

CHARACTER CODE GENERATING

The Characters you normally see on the screen, whether Alphabets or numbers or symbolic characters are normally generated or designed in a particular way. The way computer does this is what we want to learn and do it yourself.

Character generator consist of rows and columns of pixels or points on the screen that will display the character you want to create.

EXAMPLES OF CHARACTER GENERATOR


This diagram show letter A. It has six rows and seven column of dots. certain dots are coloured and the rest are white. The area coloured describe the character to be generated. Electronically, those dots are on on the screen, while the rest remain off.


Another example of character to be generated is letter W. Letter W require more dots than that of A, so, to generate W a maximum of 8 rows and 8 columns of dots are required. So, generally, a maximum of 8 row and 8 columns are used. You should be able to determine how many of these will be needed for each character.

HOW TO DRAW THE CHARACTER

Use Powerpoint package to do this. Open power point and insert new slide to have more than one slide. remove the heading and body text box on the slide to have a plane slide. Then go to insert on power point tabs on the top of the package and click shape. From the shape choose sphere and create a round shape of small size. Then try to duplicate the shape so that the radius will be uniform. Use this shape to create your characters as shown from the examples above.

TO GENERATE THE CODE

To generate the character code draw a table like the above containing the same number of rows and columns as you have in the character you are generating. The column and the row that is coloured will be assigned 1 while the one that is white will be zero.
After this, a row will be compressed by using Hexadecimal to reduce the numbers in your code.

For my Example character A the code will be reduce to 0C12121E121212
Two digits will be for a row e.g 001100, 00 give you 0, 1100 give you C. This can be determined from the Hexadecimal table shown below.

In other word, what you are to do is that you create a character, create a code table for each character and compress the code to a single line codes. Submit this when you resume.

Tuesday, June 19, 2018

CREATING CALCULATOR USING LOGISIM (PART 3)


THE PROCESSING PART OF THE CALCULATOR


The processing part involve majorly the Operators which perform the multiplication, Division, Addition and Subtraction. Each Operator key on the Keypad is linked to each operation circuit that perform each Arithmetic operation. Each operator is connected to a multiplexer with a 2 bit selector which select 4 different operators when pressed. Below the multiplexer is a 4 to 2 encoder that connect the four operator to 2 output which goes into a register to store the data and transmit it to select part of the MUX (multiplexer). As a key operator is pressed, it select an operation and direct the result to a 4 BIT BCD. A splitter is used to split 16 bits output to different 4 bits result to be display on the 4 digits hex seven seg. Display. Create your processing part by following the diagram and choose the appropriate components from the library. Notice each tunnels on the part of the circuits, they are the connecting part of the processing parts to the Display part. Check the Display part for the same tunnels bearing the name with each tunnel in diagram. Your Display circuit should bear the same component as shown in the Diagram below.


PLEASE CLICK THIS XML FILE AND CLICK THE LINK BELOW TO COPY A FILE INTO A MS NOTE PAD AND SAVE IT AS CALCULATOR LIB.circ 

This file is needed to create some of the component use in this project that is not in Logisim.

Please post comment to show areas that is not clear to you. thanks


Wednesday, June 13, 2018

CREATING CALCULATOR USING LOGISIM (PART 2)

THE LED DISPLAY

The LED display is the one that display the value of the Key pressed and also the result of the computation.


The figure above show the LED display and all the circuit that make it display numeric information. The component containing 3 in four places is the shift Register. It has four aspect of it. On the left side we have three pins, one to enable serial shift or disable it, the second is for the input of numeric data, the third is the clock. The clock is for updating the information entering the register.
On the left side is the serial output. Above and below are the parallel input and parallel output. simultaneous information are loaded through the parallel input and can be output serially or in parallel.
For our Calculator, we have Ten input OR gate to output each key pressed. These input are the tunnels of each keys. A tunnel showing DATA is the result of the key pressed at any point in time. The Register has four stages to represent four digits on the Display (when you choose your register, change the property to four stages and four bits). The moment the digits are exhausted the second OR gate come into action igniting the negated part of the AND gate joining it with first OR gate to stop further input into the Shift Register. Under the register is the first pin which can be used to clear the screen. An input with zero is attached to it. And when it is one the screen will clear.
To create your LED display, choose Hex Digit Display from the Input/Output folder and put four of it beside each other as shown on the diagram. To make the LED Display to show the key pressed from the right, connect the LED on the right to the first stage of the shift register as shown, the second LED to the right to the second stage of the Register and so on. Also notice that the Second OR gate to stop the display when it is full is connected to the last stage of the Shift register. So that the moment the fourth stage is occupied it trigger the AND gate to stop further input.
PLEASE CHECK BACK FOR THE 3RD PART WHICH HAS TO DO WITH PROCESSING AND CALCULATIONS.

Sunday, June 10, 2018

CREATING CALCULATOR USING LOGISIM


THE INPUT PART

A Calculator is made up of 3 parts . The input (Keypad), output (digital display) and the processor.
The Calculator panel consist of a lot of components that work together to process numerical information. Though in normal Calculator you may not see all this. What you see is a central processor which have integrated all this components together.

In the class, we have seen and demonstrate how to create an adder, subtractor, multiplier, except for the divider. Also , we have discuss the multiplexer which help to select data source. Data to be fetched are stored in component called registers. To be able to fetch data, data are given addresses. so, multiplexer help to locate the data by selecting the address of the data.

One thing we have also learn is the conversion of binary to decimal by using BCD to seven segment converter  and then display it with seven segment LED display. In Calculator, the keypad shows decimal numbers 0 to 9. Each decimal numbers have binary equivalent understood by the machine.

In the Calculator, there is a register that contain what is called key code for each key on the keypad. When a key is pressed, the code is transmitted and move to the display register to display the key pressed. Usually when  a key is pressed it bounce back the moment it is released, but the register store the data transmitted.

On the Calculator is also found the operators for addition, subtraction, division and multiplication. When these are pressed the calculator has to perform switching operation among these operators, These are carried out by multiplexer. Multiplexers have what is called selection mode, which depend on the number of inputs required e.g 4 inputs required 22 – 2n  Where n is number of selection. So, two bits will be required for 4 inputs.

You are going to create the calculator in parts. The display part, the keypad part and processing parts and connect or link them by a component called 'Tunnel' in Logisim.


Follow the diagram shown and try to pick from Logisim those components as shown. From the library open Memory and pick registers. Change them to 4 bits. Get Tunnel from the folder called wiring and label it to bear the caption with that of the keys. Check for the diagram of the key for the tunnels attached and label your own accordingly. The tunnel help to avoid wiring which may make the design clumsy. The component label MUX is the multiplexer. You can pick this from the folder labelled Plexers. Change the the Data bit and Sel bit to 4. Then it will look like the one shown. Position it as it is shown, that is facing south. Create this part and test to see what happen when you press any key. Lastly, under wiring you will see a component called constant. It is the gray coloured component bearing number 0 to 9 attached to the 'D' part of the register. when you pick it. change it to four bit and the value to 0x and the number (e.g 0x2 for value of 2). 


KEY SELECTION PROCESSING

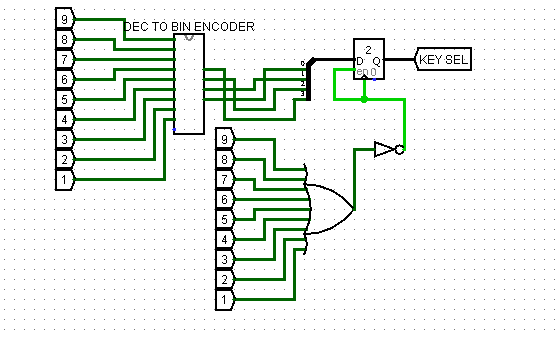
The next stage in fetching a number when a key is pressed is to select the number that will be display on the LED display. From the diagram, it show that all the registers for each key are connected to the multiplexer, but all of them cannot be output at the same time. We need to create a program that will do the selection. 4 bits are needed to select the ten numbers, so we need a circuit that will convert the decimal numbers to 4 bit binary numbers. We are going to create our converter by using Combinational Analysis as you have been taught.

The problem with this is that when add your input and output the input is always set aready for you then change the output to your taste. In this case, we are going to pick out of what have been set those binary numbers that start with 1 in each row to represent the different decimal numbers. So you select the row that have only 1 under the particular number and neglect the others. Then you change the output to bear the binary number for that decimal number.
The example is shown below.


Create your inputs starting with N9 up to N0 so that it will appear as shown. Also add your outpu in the following order D, C, B, A. Then you will have the table shown above. The first row should be zero throughout. Second row has 1 under N0, Which mean when you click number zero you should get zero. 1 under N1 mean when you click number 1 you should have 0001 which stand for number 1. So do this for all the numbers up to number 9. Then click build circuit and call your circuit DEC TO BIN ENCODER. Under your main, select this circuit you have created and connect it as shown below.


This diagram indicate that the same copy of tunnel that was used for each key is also attached to the input of the ENCODER 1 to N1, 2 to N2 up to N9. Then choose a splitter from wiring and connect it with the ENCODER as shown. You can see that a register is also connected to pick the value when the key is pressed. pick an OR gate and connect the same tunnel of the keys and the output connected to the register as shown. Combine this with the first circuit and click each key and see what happen to the output at the end of MUX as shown earlier.
The second stage will be uploaded very soon. So, return to the site to check for the second stage.


Friday, December 16, 2016

PRACTICAL TRAINING MODULE/EXERCISE


1. DEPARTMENT: COMPUTER/ICT
2. SECTION/TRADE: COMPUTER CRAFT
3. CLASS: COMPUTER CRAFT YEAR 1
4. TOPIC: NUMBER SYSTEM (BINARY CODE DECIMAL (BCD) SEVEN SEGMENT CODE)


5. OBJECTIVE/SPECIFIC LEARNING EXPERIENCE:
     At the end of the practical Training module, the students should be able to:
   (i) Describe the BCD code
   (ii) Convert 4-bit binary code to BCD code
   (iii) Describe the seven segment display code
   (iv) Identify the two different types of seven segment Display Device
 
6. WORKING CIRCUIT/DIAGRAM/DESCRIPTION:


 This is the working circuit for the practical project. You will buy 7 switches, 7 resistors of 270 ohms, 4 x 1.5 AA battery (Medium size), buy common cathode seven segment display device. Locate the common cathode pin and connect it to the -ve pole of the battery. Locate the A to G segment of the device, by testing each pin to see which pin light each segment. Then connect the circuit as shown by the circuit diagram. Note that the pins of the seven segment you will buy in the market will not be arranged as in the diagram, for this one is just for presentation. The one you will see in the market will look like the one below. Get a circuit board and mount the device and each switch that will control each segment.

From the diagram below, there are two display. One on the left is actual device, while the one on the right is show the internal circuit arrangement of the the device. From the one on the right, you will see that the device has 10 pins. 5 pins up and 5 down. The two middle pin from up and down is the same thing, you can be sure of this if you trace the Gnd pin from up down. So, to connect the ground, you just need to connect one of it to the negative pole of the battery (which is the one down). The last pin down on the right is not needed in this project so ignore it.


Watch the Animation below to get the idea of the kind of result you will get when you test your final circuit.


TRY AND OBSERVE THE CLOSING AND THE OPENING OF THE SWITCHES AND HOW IT AFFECT WHAT IS DISPLAY BY THE DISPLAY DEVICE.

7. LIST OF MATERIALS:
    (i) Seven pieces of switches (the type like these ones shown below)
                        
        if you buy the first one, the middle pin and the pin for the side marked '1'          is connected.

       (ii) Common cathode 7-Segment Display
       (iii) Seven pieces 270 ohms resistors
       (iv) circuit board
       (v) 4 pieces (1.5) batteries
       (vi) 4 sides battery container
       (vii) connecting wires
The materials above are those needed for the project, but the one below are going to be your working tools when you resume for proper training.

8. REQUIRED TOOLS:
     (I) Project Board
     (ii) Digital Multimeter
     (iii) Small Electronic screw tool box
     (iv) connecting wires (flexible wires)
     (v) Soldering iron
     (vi) Soldering lead
     (vii) light Emitting Diode (LEAD), RED (10), Yellow (10), Green (10)
     (viii) 5 circuit boards 

  PROJECT QUESTION:  
FROM THE TOPIC SHOW CASE SO FAR ON THIS SITE
1. EXPLAIN AND DESCRIBE THE BCD CODE
2. EXPLAIN AND DESCRIBE THE SEVEN SEGMENT DISPLAY CODE
3. FINALLY FOUND OUT HOW BCD CODE AND SEVEN SEGMENT DISPLAY CODE WORK TOGETHER (YOU CAN FIND MORE INFORMATION FROM OTHER SITE FOR THIS).   

IF YOU HAVE ANY COMMENT OR QUESTION CONCERNING THE INFORMATION HERE, PLEASE CLICK THE COMMENT BELOW AND POST YOUR MESSAGE. ALSO SHARE THIS WITH YOUR FRIEND ON FACEBOOK AND TWITTER BY CLICKING 'F' AND 'T' BUTTON BELLOW

Wednesday, December 14, 2016

SEVEN SEGMENT DISPLAY CODE


WHAT IS SEVEN SEGMENT DISPLAY

seven-segment display, or seven-segment indicator, is a form of electronic display device for displaying decimal numerals that is an alternative to the more complex dot matrix displays.
Seven-segment displays are widely used in digital clocks, electronic meters, basic calculators, and other electronic devices that display numerical information


7 segment display is found in LED and LCD numerical displays, where any decimal digit is made up of 7 segments arranged  figure 8, with an extra LED or LCD dot that can be used as a decimal point. Each Segment of a Seven Segment Display is represented by letter A to G. The Display of any any number depends on the combination of two or more segments.THE 7-SEGMENT DISPLAY CODEThe Seven Segment Display code is form by a series of ON and OFF of the seven segment. For example, to form figure 1, segment B and C will be ON and the remaining segments will be OFF.The Table below show the  decimal digit and the corresponding seven segment code.


SEVEN SEGMENT DISPLAY CIRCUIT

The aim of this circuit is to demonstrate how the seven segment display displays the number figures from decimal number one to nine and back to zero. 


This animated GIF shows the seven segment display and a table showing the corresponding seven segment display code as indicated in the table above. Each rows shows A to G representing each segment as labeled on the display, and bit 0 or 1 to show the ON or OFF state of each segment of the display.


This second animated GIF shows an animation of seven segment circuit. The table show A TO G representing switches. When a segment for example 'A' show 1 it mean the switch is ON and when it is 0, it means the switch is OFF. The arrows indicate connecting wires. When they are red then current is flowing, but when they are blue, it means current is not flowing. 

TYPES OF SEVEN SEGMENT DISPLAY


There are two types of seven segment display based on they mode of connection.

There is common Anode and common Cathode. Anode is equivalent to +ve pole and Cathode is equivalent to -ve pole.


                                                                                                                                                    The diagram above reveal what is inside each segment of the display device. It is actually Light Emitting Diode called LED, the one normally found in touch lights. It has two terminal, a longer one called Anode and the shorter one called cathode. Anode is connected to the positive pole of the battery and cathode to the negative pole of the battery. When connecting each LED, it is either you connect each Anode to different switch and the cathodes to a common point direct to the negative pole called ground (Common Cathode), or connect the cathode of each LED to different switch and then to the ground, then all the Anode to a common point to the positive pole of the battery ( Common Anode).  

IF YOU HAVE ANY COMMENT OR QUESTION CONCERNING THE INFORMATION HERE, PLEASE CLICK THE COMMENT BELOW AND POST YOUR MESSAGE. ALSO SHARE THIS WITH YOUR FRIEND ON FACEBOOK AND TWITTER BY CLICKING 'F' AND 'T' BUTTON BELLOW

Tuesday, December 13, 2016

BINARY CODED DECIMAL (BCD)


DEFINITION: The word BINARY CODED DECIMAL stands for Decimal number 0 - 9 in which four bits binary number 0000 to 1001 are used to represent each digit of the the decimal numeral. Or can be seen as decimal numbers coded with four bits binary numbers.


In BCD each number is defined by a binary code of 4 bits. The Code is           8 - 4 - 2 - 1, it indicate the weights of each bit 23 – 22 – 21 - 20  
Any number that is beyond 9 will be considered to have 2 digits and each digit will have its four bits binary equivalent. That is, for example, 12 will have its binary equivalent for 1 and 2, which is 0001 0010. 
E.g. 542 = 0101  0100  0010.
                   5       4        2

The difference between the ordinary four bit binary number and BCD is that binary number of decimal numbers greater than 9  is still four bits which ends with 1111 representing 15, while in BCD, it is 8 bits.

the table below shows the decimal,binary and BCD equivalent.


CONVERSION FROM BINARY TO BCD

When Binary numbers are added and the result is not greater than 9, the equivalent binary number is always the same with the BCD. But when it is greater than 9, the binary value will not be valid in BCD. For example, if the result is 15, that is, 1111 it has to be converted to BCD. To do so, 6 (0110) has to be added to the result.
                                         15 =        1111
                                           6 =        0110
                                                        0101
From the addition, the leftmost addition has a carry of 1, which is carried to the next place value.
The result is 0001 0101 which correspond to what we have on the table.
To prove this, the difference between any BCD and corresponding Binary is 6 (0110).

Why number 6 added ? 6 is being added to binary numbers because after 9 there are 6 additional digits to complete the 4- bits binary number of 1111. So, to reset the excess binary number back to 9 (1001) or binary that is within the BCD range 6 (0110) is added to make the counting skip the remaining six decimal values i.e from 10 to 15 which does not obey BCD to return to the BCD codes.


USES OF BCD CODE

BCD Code find usefulness when processing numerical values to be transmitted and display by digital electronic devices which uses seven segment display devices. This device is found in Calculator, Digital Watches.


IF YOU HAVE ANY COMMENT OR QUESTION CONCERNING THE INFORMATION HERE, PLEASE CLICK THE COMMENT BELOW AND POST YOUR MESSAGE. ALSO SHARE THIS WITH YOUR FRIEND ON FACEBOOK AND TWITTER BY CLICKING 'F' AND 'T' BUTTON BELLOW.